
Description
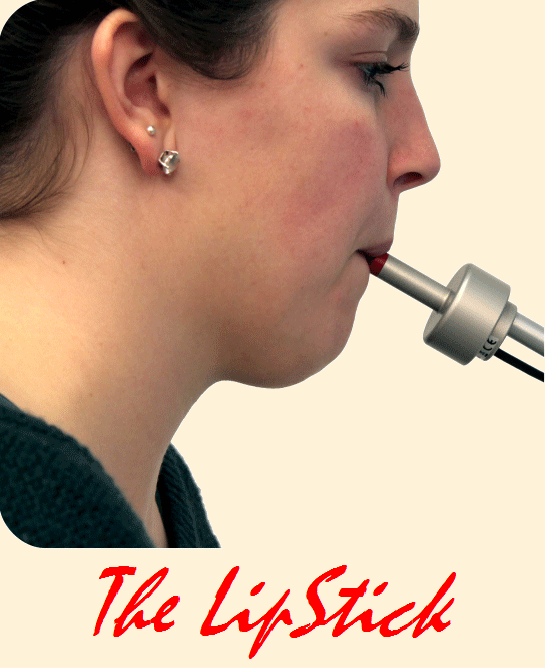
- The Lipstick is an alternative computer mouse for people who cannot use a standard mouse.
- With the LipStick, all mouse functions can be controlled with the mouth. Anybody who has problems with a hand-controlled mouse, may benefit from the LipStick.
- The screen cursor follows the movements of the mouth. The left- and right mouse buttons are operated by lifting one of the lips.
- While other mouth-operated mice use sipping and puffing to control the mouse buttons, the LipStick has capacitive sensors in the tip that monitor the position of the lips.
Introduction
- Because the tip is completely closed, there are no hygienic problems with saliva build-up and cleaning is easy. It is also a good solution for people who are on a respirator and have difficulties with sipping and puffing.
- Unlike most other mouth-operated computer mice, the LipStick is not a joystick but a force stick. There are no moving parts and it needs only small head movements.
- The LipStick is based on a unique new sensor technology that allows accurate measurement of microscopic distortions of the virtually solid aluminum housing. This makes the LipStick very sensitive and very robust at the same time.
Key features
- Very sensitive force control. Only small head movements necessary.
- Very accurate at small movements. Pixel by pixel is quite feasible.
- Automatic acceleration for smooth and fast at large movements.
- Mouse clicks by raising and lowering lips.
- Free choice of upper- or lower lip for left- or right mouse clicks.
- Mouse dragging is easily possible.
- Bite proof mouthpiece of high performance medical grade plastic.
- Robust metal case. Not sensitive to shock or vibration.
- Completely closed construction for optimal hygiene.
- Easily cleaned with any common detergent or disinfectant.
- No parts that can wear or have to be replaced regularly.
- Can be used in any position. Using while lying in bed possible.
- Automatic sensor calibration. No reset button necessary.
- Plug and play for Windows, Apple, Linux and Android.
- With Windows software for individual adjustments.
Mounting and using
- Mount the LipStick firmly on the computer table. The cable outlet should be on the underside of the device. Your dealer can supply a suitable mounting system wih a ¼ inch standard camera thread.
- Make sure that the LipStick is mounted in such a way, that your head is in a relaxed and comfortable position when the tip is between your lips. Also, make sure that you have a good, unobstructed view on the computer monitor.
- The shaft of the Lipstick should be tilted in such a way that both lips cover about the same area of the mouthpiece.
- Plug the connector into a free USB port of your computer. The LipStick is a plug and play device that will be recognized automatically. There is no need for any special drivers.
- A good mounting position of the LipStick is of prime importance.
- From all factors that influence user comfort, this is the most important!
- Because the LipStick calibrates itself at power up, you must not touch the tip for at least 10 seconds after switching on.
User software
- The LipStick is a plug and play device that can be used right out of the box. The factory default settings will satisfy most users.
- However, it comes with special Windows software that can be used to change various settings to suit personal preferences or applications. Up to five user setting profiles can be stored and quickly and easily selected.
- All changes are stored in the LipStick itself. If you use the device with another computer, your personal preferences are retained.
main screen
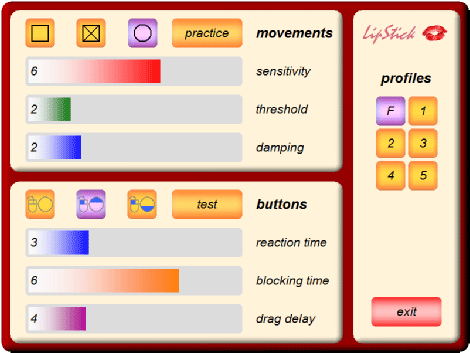
- In this screen you can change the settings of the LipStick. It consists of three panels: movements, buttons and profiles. The size of the main screen is fixed, but it can be moved around the computer screen.
Movements panel
- The settings can be changed with control bars. A mouse click in the grey area will increase the value, a click in the colored area will decrease the value. The current value is shown by the length of the colour bar and a number in the left-hand side of the bar.
sensitivity

- The upper control bar sets the sensitivity of the LipStick. The higher the value of the sensitivity, the faster the screen cursor will move for a given force.
- The sensitivity can be adjusted from 1 to 9. The factory setting is 6.
threshold

- The threshold control bar sets the minimum force that must be exerted on the tip of the LipStick before the screen cursor can start moving. With a low threshold setting, even a very small force will move the cursor. Higher values of the threshold can help users with imperfect motor control but may cause a somewhat step-like movement of the cursor.
- If one wants to work very precisely, for instance with a drawing program, one can temporarily choose a combination of low sensitivity and a low threshold. (See also Profiles). The threshold can be adjusted from 1 to 6. The factory setting is 2.
Practice screen
- After clicking the practice button in the movements panel, you get a screen that can be used to try out the current settings. By performing simple tasks, you can get an impression of the speed and accuracy of your cursor movements.
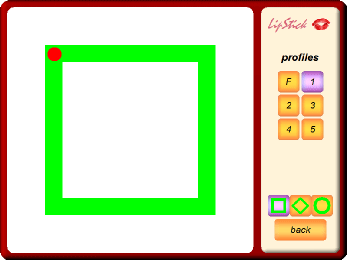
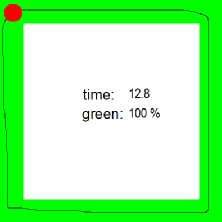
- Start by clicking the red dot. Then move the cursor, as fast as you can, around the green figure until you reach the dot again, keeping the cursor in the green.
- A black line shows the trajectory of the cursor. As soon as you reach the red dot again, the time (in seconds) it took to complete the task appears in the middle. Also shown is the percentage of time spent in the green.
- By clicking one of the three buttons in the lower right corner, you can choose a different figure.

buttons panel
reaction time

- This control bar sets the minimum time a lip has to be lifted from the tip of the LipStick before a mouse click is sent to the computer. The higher the value, the longer the lip has to stay up. Typical reaction times are just a fraction of a second. The reaction time can be adjusted from 1 to 8. The factory setting is 3.
- Increasing the reaction time may reduce unwanted mouse clicks.
blocking time

- To generate a double-click, the lip has to be raised and lowered two times in rapid succession. If the mouse cursor moves between the two clicks, the computer will not recognize the event as a double-click, but as two single clicks. To help prevent this happening, the LipStick blocks all cursor movements for a short time after a mouse click. The value of the blocking time can be set from 1 to 8. The factory setting is 6.
- Unintentional movements of the cursor are a frequent cause of problems with double-clicking. Increasing the blocking time may help.
click test
- After clicking the button test in the main screen, the upper panel changes to a grey rectangle with three vertical lines, the so-called test area. This can be used to test the click behavior of the LipStick, when one experiences difficulties with clicking.

to test a single click
- Move the mouse cursor into the grey rectangle, lift the upper lip shortly from the tip and lower it again. After a few seconds, the -test area could look like this:
- From the moment that the upper lip leaves the tip, an elongating green time bar is displayed. As soon as the lip is lowered, the green bar ends. The timeline continues to the end of the test area. (The meaning of the orange bar and other lines is discussed later.)
- Lifting the lower lip from the tip instead of the upper lip causes a red time bar to grow instead of a green one.
- The position of the blue line indicates the reaction time setting (adjustable with the blue control bar). A mouse click is generated only when the upper lip remains lifted until the green bar has passed the blue line. When the lip is lowered before the blue line is reached, no mouse click will be generated.
profiles panel
- All user settings of the LipStick are stored within the device in so called profiles. A purple button indicates the current profile. Each profile can hold different settings, optimized for different computer applications or for different users. The factory profile F cannot be changed.
- Clicking the desired profile button selects another profile. On first use, all profiles have the same settings as the factory profile.
- When you close the program or select another profile while some settings are changed, the program will ask you if you want to save the changed settings to the current profile. If you select no, all changes are discarded. This allows you to experiment with all the settings without any risks. You can always return to the factory settings by selecting the factory profile F.
- By clicking the LipStick icon a small screen pops up, showing information about the current software version.
Technical details
- Computer connection: USB 1.1 FS (compatible with USB 2 and USB 3) | Composite HID device
- Power supply: USB: 5V / 25 mA
- Mounting: Standard camera thread (UNC ¼ ) | Maximum screw depth 10 mm
- Weight: 100 grams
- Temperature range: Operating temperature between -20°C and +50°C
- Lip switches: Capacitive touch. Up/Down differential | Electrically fully isolated
- Material mouthpiece: POM: RÖCHLING SUSTARIN C Medical
- Material house: Aluminum ST51 anodized
- Environmental: IP63. Dust-, rain- and splash proof
- Warranty: Manufacturer provides full warranty against defects in materials or workmanship for a period of five years.
Table Stand Mounting
- The table stand is both elegant and firm. It is fully adjustable and can be used to mount the LipStick in almost any position.
- It is available in the colours black and silver-grey.
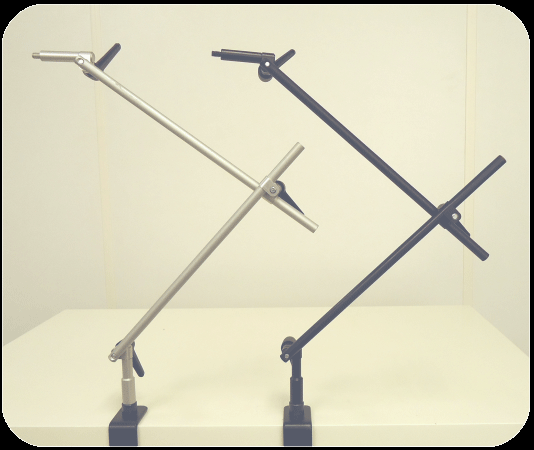
The table stand can also be used to mount other devices than the LipStick. Standard mounting method is a ¼ inch camera thread. Other mounting options are available on request.